Disqus
Disqus is a global comment system that improves discussion on websites and connects conversations across the web.
- Create an account and log into Disqus. Once logged in, click the
GET STARTEDbutton on the homepage, then selectI want to install Disqus on my siteoption and you will see theCreate a new siteinterface. - Enter your
Website Name, which will serve as your Disqus shortname, and select a Category from the drop-down menu. Then clickCreate Sitebutton. - Choose
I don't see my platform listed, install manually with Universal Code, configure Disqus for your site, and clickComplete Setupbutton. - Set the value
enabletotrue, add the obtained Disqus shortname (shortname), and edit other configurations indisqussection in the theme config file as following:next/_config.yml 1
2
3
4disqus:
enable: false
shortname: your-short-disqus-name
count: true
DisqusJS
Render Disqus comment component using Disqus API.
- Get your Disqus API Key from Disqus API Application.
- Go to the settings page of your Disqus Application, enter your domain in Settings -> Domains.
- Get your Disqus Shortname from General Settings - Disqus Admin.
- Set the value
enabletotrue, add the obtained Disqus API Key (apikey) and Shortname (shortname), and edit other configurations indisqusjssection in the theme config file as following:next/_config.yml 1
2
3
4
5
6
7
8
9
10
11
12
13# DisqusJS
# Alternative Disqus - Render comment component using Disqus API
# Demo: https://suka.js.org/DisqusJS/
disqusjs:
enable: false
# API Endpoint of Disqus API (https://disqus.com/api/)
# leave api empty if you are able to connect to Disqus API
# otherwise you need a reverse proxy for Disqus API
# For example:
# api: https://disqus.skk.moe/disqus/
api:
apikey: # register new application from https://disqus.com/api/applications/
shortname: # See: https://disqus.com/admin/settings/general/
Facebook Comments and Likes
The Facebook comments plugin lets people comment on content on your site using their Facebook account. People can choose to share their comment activity with their friends (and friends of their friends) on Facebook as well. The comments plugin also includes built-in moderation tools and social relevance ranking.
Firstly you need to integrate Facebook SDK, by setting following options in theme config file:
next/_config.yml 1
2
3
4
5
6
7# Facebook SDK Support.
facebook_sdk:
enable: false
app_id: #<app_id>
fb_admin: #<user_id>
like_button: #true
webmaster: #trueThen set the value
enabletotrueinfacebook_comments_pluginsection, and change following options below:next/_config.yml 1
2
3
4
5
6
7
8# Facebook comments plugin
# This plugin depends on Facebook SDK.
# If facebook_sdk.enable is false, Facebook comments plugin is unavailable.
facebook_comments_plugin:
enable: false
num_of_posts: 10 # min posts num is 1
width: 100% # default width is 550px
scheme: light # default scheme is light (light or dark)
VKontakte Comments and Likes
VKontakte offers flexible commentting tools that can be easily built into your website. This enables VK users to comment on your materials without having to register on your site.
Login to VKontakte Developers and create apps. Go to the Comments Widget, you will get some code:
1 | <script type=“text/javascript”> |
You can enable it by editing values vkontakte_api.enable to true, and copy API_ID value of apiId key in theme config file.
1 | vkontakte_api: |
With «Like» widget your visitors can express their attitude towards an article with one click or immediately share the link to it with their friends.
Login to VKontakte Developers and create apps. Go to the Like Widget, you will get some code:
1 | <script type=“text/javascript”> |
You can enable it by editing values vkontakte_api.enable to true, and copy API_ID value of apiId key in theme config file.
1 | vkontakte_api: |
LiveRe
LiveRe is a content platform based on social networking site reviews to help users communicate freely.
- Create an account or log into LiveRe, click on the
installationbutton and select the free city version, then click on theinstall nowbutton. - Copy the
data-uidfield in the installation code to get your LiveRe UID. Add the obtained LiveRe UID to the
livere_uidsection in the theme config file as following:next/_config.yml 1
2
3# Support for LiveRe comments system.
# You can get your uid from https://livere.com/insight/myCode (General web site)
livere_uid: your_uid
Gitment
Gitment is an commenting system based on GitHub Issues, which supports for direct introduction at the front end does not require any backend code. You can log in, view, comment, like, etc. on the page, with full Markdown / GFM and code highlighting support.
Gitment can only use GitHub accounts for comments.
- Click here to sign up for a new OAuth Application. Other content can be filled in at will, but be sure to fill in the correct callback URL (usually the domain name corresponding to the comment page). Then you will get a Client ID and a Client secret, which will be used for subsequent user logins.
- Create a repository you want to store Gitment comments in your GitHub.
Set the value
enabletotrue, add Client ID (client_id) and Client secret (client_secret) in step 1, add your Github username (github_user) and the created repository name (github_repo) in step 2, and edit other configurations ingitmentsection in the theme config file as following:next/_config.yml 1
2
3
4
5
6
7
8
9
10
11
12
13
14
15# Gitment
# Introduction: https://imsun.net/posts/gitment-introduction/
gitment:
enable: false
mint: true # RECOMMEND, A mint on Gitment, to support count, language and proxy_gateway
count: true # Show comments count in post meta area
lazy: false # Comments lazy loading with a button
cleanly: false # Hide 'Powered by ...' on footer, and more
language: # Force language, or auto switch by theme
github_user: # MUST HAVE, Your Github Username
github_repo: # MUST HAVE, The name of the repo you use to store Gitment comments
client_id: # MUST HAVE, Github client id for the Gitment
client_secret: # EITHER this or proxy_gateway, Github access secret token for the Gitment
proxy_gateway: # Address of api proxy, See: https://github.com/aimingoo/intersect
redirect_protocol: # Protocol of redirect_uri with force_redirect_protocol when mint enabledAfter the post is published, you will need to visit this page, log in with your GitHub account and click the
Initialize button, then other users can post comments on this page.
Please note that the authorized permission of Gitment will obtain the read and write access to all your public repositories and maybe send github keys to the 3rd-party imsun’s proxy server. If you concern about the security, we strongly deprecated to use gitment. Useful link
Gitalk
Gitalk is a modern comment component based on Github Issue and Preact.
Gitalk can only use GitHub accounts for comments.
- Click here to sign up for a new OAuth Application. Other content can be filled in at will, but be sure to fill in the correct callback URL (usually the domain name corresponding to the comment page). Then you will get a Client ID and a Client secret.
- Create a repository you want to store Gitalk comments in your GitHub.
Set the value
enabletotrue, add Client ID (client_id) and Client secret (client_secret) in step 1, add your Github username (github_idandadmin_user) and the created repository name (repo) in step 2, and edit other configurations ingitalksection in the theme config file as following:next/_config.yml 1
2
3
4
5
6
7
8
9
10
11
12
13
14# Gitalk
# Demo: https://gitalk.github.io
gitalk:
enable: false
github_id: # Github repo owner
repo: # Repository name to store issues
client_id: # Github Application Client ID
client_secret: # Github Application Client Secret
admin_user: # GitHub repo owner and collaborators, only these guys can initialize github issues
distraction_free_mode: true # Facebook-like distraction free mode
# Gitalk's display language depends on user's browser or system environment
# If you want everyone visiting your site to see a uniform language, you can set a force language value
# Available value: en, es-ES, fr, ru, zh-CN, zh-TW
language:
Valine (China)
Valine is a fast, simple & efficient Leancloud based no back end comment system.
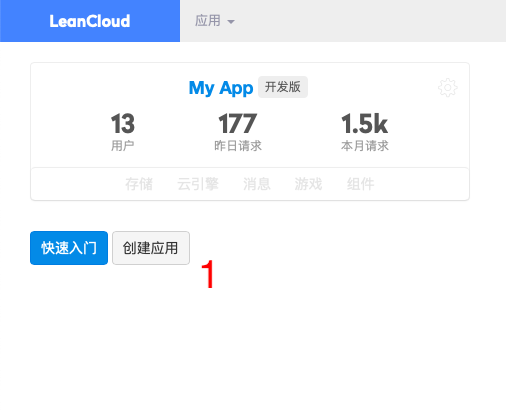
- Create an account or log into LeanCloud, and then click on the bottom left corner to create the application in dashboard.

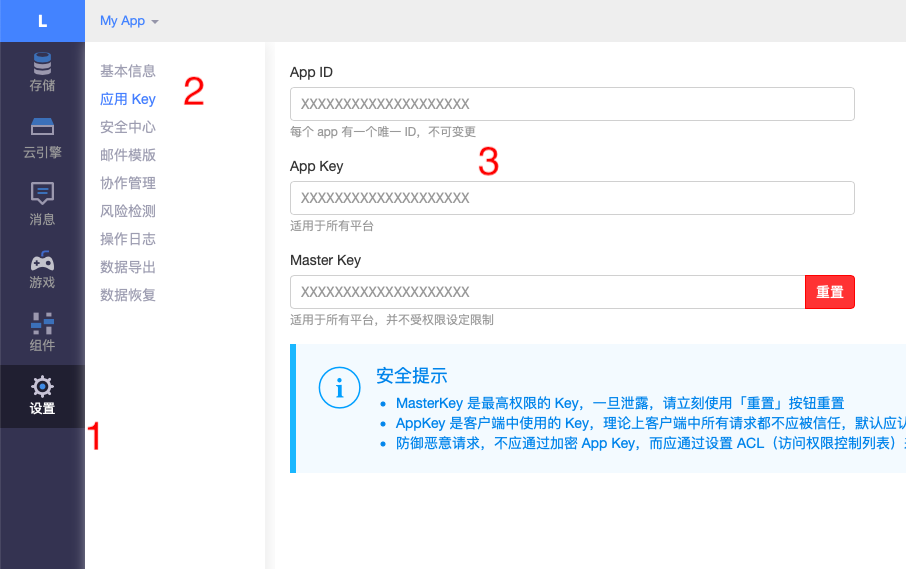
- Go to the application you just created, select
Settings -> Apply Keyin the lower left corner, and you will see your APP ID and APP Key.

Set the value
enabletotrue, add the obtained APP ID (appid) and APP Key (appkey), and edit other configurations invalinesection in the theme config file as following:next/_config.yml 1
2
3
4
5
6
7
8
9
10
11
12
13
14# Valine.
# You can get your appid and appkey from https://leancloud.cn
# more info please open https://valine.js.org
valine:
enable: false # When enable is set to be true, leancloud_visitors is recommended to be closed for the re-initialization problem within different leancloud adk version.
appid: # your leancloud application appid
appkey: # your leancloud application appkey
notify: false # mail notifier , https://github.com/xCss/Valine/wiki
verify: false # Verification code
placeholder: Just go go # comment box placeholder
avatar: mm # gravatar style
guest_info: nick,mail,link # custom comment header
pageSize: 10 # pagination size
visitor: false # leancloud-counter-security is not supported for now. When visitor is set to be true, appid and appkey are recommended to be the same as leancloud_visitors' for counter compatibility. Article reading statistic https://valine.js.org/visitor.html
Changyan (China)
Changyan is the industry’s leading social commenting system, supporting both PC and mobile access methods, providing a new way of commenting on websites. Changyan has a variety of common account login, triple filtering mechanism, real-time data statistics, fast data export, comprehensive support for mobile and other leading functions. It fully satisfies the needs of major websites for user login, comment, sharing, and review.
- Create an account or log into Changyan, then add your site to get APP ID and APP KEY.
Set the value
enabletotrue, and add the obtained APP ID (appid) and APP KEY (appkey) to thechangyansection in the theme config file as following:next/_config.yml 1
2
3
4
5# changyan
changyan:
enable: false
appid:
appkey:
Please note that you should fill in the ICP record number of your website in time. If not, or the record information is not correct, the comment service will be stopped after 13 days. Useful link
Widgetpack Rating
Rating service with login through any social networks like Facebook, Twitter, Google+, LinkedIn, Instagram and others.
Login to widgetpack and add new site, you will get your site ID:
1 | wpac_init.push({widget: ‘Rating’, id: ID}); |
You can enable it by editing values rating.enable to true, and copy ID value of id in theme config file. You can also configure the rating color by editing values in rating.color section.
1 | rating: |